Managing Server Files via SSH on SiteGround
Some links on this page are affiliate links. If you buy through them, we may earn a commission at no extra cost to you. It never decides what we recommend —read how we make money.
File Manager and FTP cover most needs. SSH gives you a command line on the server itself, which is faster for repetitive jobs and unlocks developer tools like WP-CLI, WordPress’s command-line interface. WP-CLI comes preinstalled on SiteGround’s servers, and SSH is available on all accounts.
This guide walks through the first connection, where your files are, and the commands and WP-CLI tasks worth knowing. SiteGround details are from its SSH and Speed Optimizer documentation, checked in September 2026.
Connecting for the First Time
-
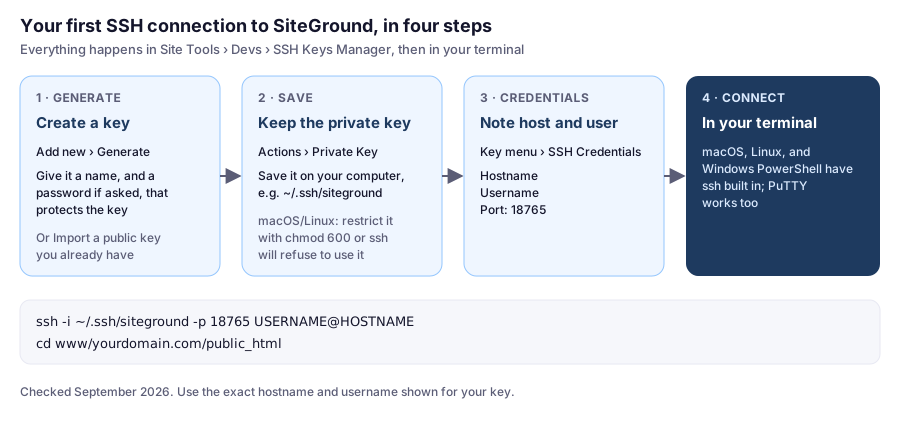
Create a key. In Site Tools, go to Devs › SSH Keys Manager, choose Add new, then Generate. If you already use SSH keys, you can import your existing public key instead.
-
Save the private key. From the key’s Actions menu, open Private Key, copy it, and save it as a file on your computer, for example
~/.ssh/siteground. On macOS or Linux, restrict its permissions, orsshwill refuse to use it:chmod 600 ~/.ssh/siteground -
Get your credentials. From the key’s menu, choose SSH Credentials to see the hostname, username, and port. SiteGround uses port 18765, not the default 22.
-
Connect. macOS, Linux, and Windows PowerShell all include
ssh:ssh -i ~/.ssh/siteground -p 18765 USERNAME@HOSTNAMEOn Windows, you can also use PuTTY: enter the hostname, choose SSH, and set the port to 18765.
Tip: add an entry to ~/.ssh/config so you can connect with just ssh mysite:
Host mysite
  HostName HOSTNAME
  User USERNAME
  Port 18765
  IdentityFile ~/.ssh/siteground
Where Your Files Are
After you connect, you start in your account’s home folder. Each site’s files live under www, with the public web root in public_html:
cd www/yourdomain.com/public_html
ls -la
That folder contains wp-config.php, wp-admin, wp-includes, and wp-content, which holds your themes, plugins, and uploads. Run WP-CLI commands from here.
Everyday Commands
| Command | What it does |
|---|---|
ls -la |
List files, including hidden ones like .htaccess, with sizes and dates |
cd wp-content/plugins |
Move into a folder |
cp wp-config.php wp-config.php.bak |
Copy a file before editing it |
nano wp-config.php |
Edit a file in the terminal (Ctrl+O saves, Ctrl+X exits) |
du -sh wp-content/uploads |
See how much space a folder uses |
find . -mtime -2 -type f |
List files changed in the last two days, useful after a suspected hack |
WP-CLI Tasks That Save the Most Time
Run these from public_html:
wp core version                      # WordPress version
wp plugin list --update=available    # plugins with pending updates
wp db export backup-$(date +%F).sql  # quick database backup
wp user list --role=administrator    # who has admin access
wp sg purge                          # clear SiteGround's caches
wp sg purge comes from SiteGround’s Speed Optimizer plugin and purges its dynamic, file-based, and object caches. Add a URL to purge a single page instead.
Updating from the command line: wp plugin update --all updates every plugin in one go. It’s fast, and just as capable of breaking a site as clicking Update. Take a backup first, update on staging if your plan has it, and check the site afterward.
Replacing a URL across the database, for example after a domain change, is safer with WP-CLI than with any manual edit, because it handles serialized data. Always run it with --dry-run first:
wp search-replace 'https://old-domain.com' 'https://new-domain.com' --dry-runSafety Habits
- Copy before you edit. A
.bakcopy ofwp-config.phpor.htaccessmakes undoing a typo a one-line job. - Be careful with
rm. There’s no trash on the server. Runlswith the same path first to see exactly what you’d delete. - Delete exported files from the server when you’ve downloaded them. A database export left in
public_htmlcould be downloaded by anyone who guesses its name. - One key per person. SiteGround’s documentation notes that SSH keys give access to all of the site’s files and can’t be limited to a folder. Give each developer their own key and delete it when their work ends. For folder-level access, use an FTP account instead.
- Keep the private key private. Anyone with the file (and its password, if you set one) can log in.
FAQ
How do I connect to SiteGround with SSH?
Create a key in Site Tools › Devs › SSH Keys Manager, save the private key from its Actions menu, and get the hostname and username from SSH Credentials. Then connect with ssh -i path-to-key -p 18765 USERNAME@HOSTNAME.
What SSH port does SiteGround use?
Port 18765, rather than the default port 22.
Is WP-CLI available on SiteGround?
Yes. WP-CLI comes preinstalled on SiteGround's servers. Connect over SSH, go to your site's public_html folder, and run wp commands.
Where are my WordPress files on SiteGround?
Under your home folder in www/yourdomain.com/public_html. That folder contains wp-config.php and the wp-content folder with your themes, plugins, and uploads.
How do I clear the SiteGround cache from the command line?
Run wp sg purge from your site's folder. It clears Speed Optimizer's dynamic, file-based, and object caches; add a URL to purge a single page.
Why does ssh say my private key permissions are too open?
On macOS and Linux, ssh refuses keys that other users can read. Run chmod 600 on the key file, then connect again.
Coming Up
With command-line access covered, the next practical task is getting your files onto the server, which the next guide covers across several methods.