Uploading Files to Your SiteGround Server: Four Methods Compared

Some links on this page are affiliate links. If you buy through them, we may earn a commission at no extra cost to you. It never decides what we recommend —read how we make money.
Sooner or later you’ll need to get files onto your server that don’t fit WordPress’s own upload button: a custom theme, a folder of product images, a large video, or a backup archive. On SiteGround there are four practical routes, and the right one depends on how many files you’re moving and who’s doing it.
Which Method to Use
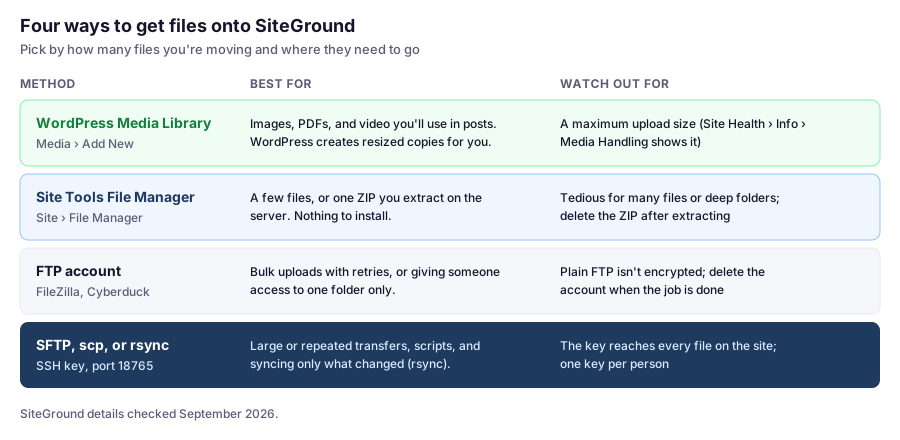
A rule of thumb: if the file belongs in a post or page, use the Media Library, even for large batches. Files uploaded around WordPress, such as by FTP into the uploads folder, don’t appear in the Media Library, and WordPress won’t create resized versions of them.
Method 1: The WordPress Media Library
For images, PDFs, and other media you’ll use in content, go to Media › Add New Media File and drag files in. WordPress stores them in wp-content/uploads, creates resized copies for different screen sizes, and makes them selectable in the editor.
If an upload fails with a size error, check the limit under Tools › Site Health › Info › Media Handling. For very large files, such as long videos, a video host is usually a better home than your web hosting.
Method 2: Site Tools File Manager
Built into Site Tools, with nothing to install:
- Open Site Tools › Site › File Manager.
- Go to the folder you want, usually inside
public_html. - Upload your files.
For many files, upload one archive instead. Zip the folder on your computer, upload the single .zip, then extract it on the server from File Manager’s menu. Transferring one archive is far quicker than thousands of small files. Delete the .zip afterward so it doesn’t sit in a public folder.
Method 3: An FTP Client
For large batches, an FTP client like FileZilla or Cyberduck queues transfers and retries failed ones. Create an FTP account in Site Tools › Site › FTP Accounts; you can limit it to one folder with Change Home, which is useful when someone else is uploading. Our FTP guide covers the setup and connection details.
Plain FTP isn’t encrypted, so avoid it on public Wi-Fi. For your own transfers, SFTP (next) is the better choice.
Method 4: SFTP, scp, or rsync
With an SSH key set up (see our SSH guide), you can move files from a terminal. Use the hostname and username from Devs › SSH Keys Manager › SSH Credentials, and SiteGround’s port 18765.
Copy one file with scp (note the capital -P for the port):
scp -P 18765 -i ~/.ssh/siteground ./my-theme.zip USERNAME@HOSTNAME:www/yourdomain.com/public_html/wp-content/themes/Sync a folder with rsync, which only transfers what changed and is ideal for repeated uploads:
rsync -avz -e "ssh -p 18765 -i ~/.ssh/siteground" ./my-theme/ USERNAME@HOSTNAME:www/yourdomain.com/public_html/wp-content/themes/my-theme/Add --dry-run to either rsync command first to see what it would change. The trailing slashes matter: ./my-theme/ copies the folder’s contents into the destination folder.
Any SFTP client, including FileZilla and Cyberduck, can also connect with the same key if you prefer a graphical window.
After Uploading: Check Permissions
If something doesn’t load after an upload, such as a theme that won’t activate or images that return errors, check permissions. WordPress’s own recommendation for most sites is:
- Folders:
755 - Files:
644 wp-config.php: can be tighter, such as600or640, as long as the site still loads
You can check and change permissions in File Manager, or over SSH:
find wp-content/themes/my-theme -type d -exec chmod 755 {} \;
find wp-content/themes/my-theme -type f -exec chmod 644 {} \;
Never set anything to 777. It lets any process on the server write to that file or folder.
FAQ
What's the easiest way to upload files to SiteGround?
For media used in posts, the WordPress Media Library. For a few other files, Site Tools › Site › File Manager, with nothing to install. For many files, upload a single ZIP through File Manager and extract it on the server.
Why don't files I uploaded by FTP show up in the Media Library?
The Media Library only lists files uploaded through WordPress, which records them in the database and creates resized copies. Files copied directly into wp-content/uploads aren't registered. Upload media through Media › Add New Media File instead.
How do I upload files to SiteGround from the command line?
Use scp or rsync over SSH with your SiteGround SSH key and port 18765, for example scp -P 18765 -i path-to-key file USERNAME@HOSTNAME:www/yourdomain.com/public_html/. Get the hostname and username from SSH Keys Manager.
What file permissions should WordPress files have?
Generally 755 for folders and 644 for files, with wp-config.php optionally tighter. Never use 777.
How do I find my maximum upload size in WordPress?
Go to Tools › Site Health › Info and open the Media Handling section, which lists the maximum upload file size.
Next Up
With files in place, the next step is protecting folders you don’t want just anyone browsing. That’s what directory protection handles.