Setting Up Business Email on SiteGround

Some links on this page are affiliate links. If you buy through them, we may earn a commission at no extra cost to you. It never decides what we recommend —read how we make money.
An address like [email protected] looks more credible than a free webmail address on invoices, contact forms, and business cards. SiteGround includes email hosting with its web hosting plans, but because it isn’t part of the WordPress setup, it’s easy to overlook.
This guide covers creating a mailbox, connecting it to the apps you already use, and the part most tutorials skip: checking the authentication records that decide whether your messages land in the inbox or in spam. Details are from SiteGround’s email documentation, checked in September 2026.
Step 1: Create a Mailbox
- In Site Tools, go to Email › Accounts.
- Enter the name you want before the
@, such ashelloorjane. - Set a strong password, or generate one, and save it in your password manager.
- Click Create.
A few addresses worth considering:
- A personal address for each person, such as
jane@, so replies go to someone specific - A role address like
hello@orsupport@for your website’s contact form and public listings - Forwarders instead of extra mailboxes when you just want mail to reach an inbox you already check (next step)
Step 2: Decide How You’ll Read It
You have three options, and you can mix them:
- Webmail: open it from the account’s menu in Email › Accounts. No setup, good for quick checks.
- Your phone or mail app: Outlook, Apple Mail, Thunderbird, and others connect using IMAP and SMTP (settings below).
- Forwarding: under Email › Forwarders, send copies of incoming mail to an address you already use. Handy for role addresses, though replies will come from the other address unless you configure sending too.
Step 3: Connect a Mail App
Get the exact settings from Email › Accounts › the account’s menu › Mail Configuration › Manual Settings. That page always shows the correct server names for your account. In general:
| Setting | Value |
|---|---|
| Incoming (IMAP) | The server shown in Manual Settings, port 993, SSL/TLS |
| Outgoing (SMTP) | The same server, port 465, SSL/TLS |
| Username | Your full email address |
| Password | The mailbox password |
Use IMAP rather than POP3. IMAP keeps mail on the server, so your phone, laptop, and webmail all show the same inbox. POP3 downloads mail to one device, which is how messages “disappear” from the others.
Step 4: Check That Your Mail Will Be Trusted
A mailbox that sends fine can still land in recipients’ spam folders. Receiving servers check three DNS records to decide whether a message really came from your domain:
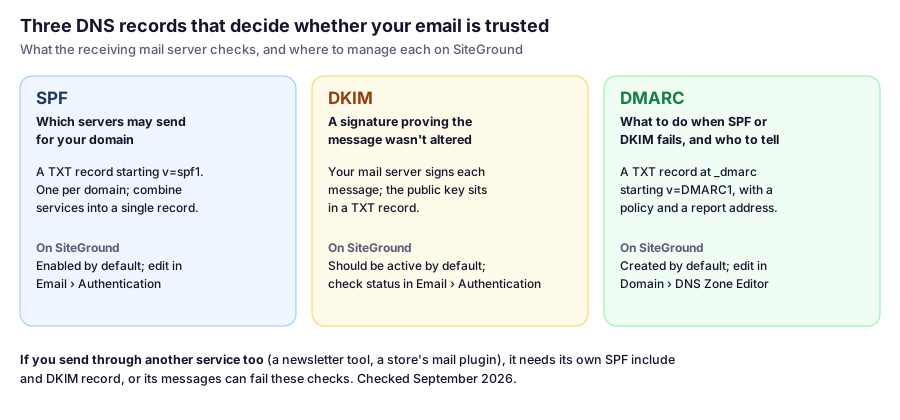
SPF is enabled by default, DKIM should be active by default, and a DMARC record is created when the website is set up. It’s still worth checking once, because they only apply if your domain uses SiteGround’s DNS:
- In Site Tools, go to Email › Authentication.
- Under DKIM, confirm the status says Active. If it’s inactive, click Activate.
- Under SPF, check the record. If a newsletter tool or store plugin also sends mail as your domain, add its include here so there’s still only one SPF record.
- In Domain › DNS Zone Editor, find the TXT record starting with
v=DMARC1. SiteGround notes that DMARC needs an email address to receive reports; set one you actually read.
Confirm from outside (macOS or Linux; on Windows use nslookup -type=TXT with the same names):
dig +short yourdomain.com TXT
dig +short _dmarc.yourdomain.com TXT
You should see exactly one record starting with v=spf1, and one DMARC record.
The real test: send a message from your new address to a Gmail account, open it, and choose Show original. Gmail lists SPF, DKIM, and DMARC results at the top. All three should say PASS.
Common Problems
| Symptom | Likely cause | Fix |
|---|---|---|
| Mail app can’t connect | Wrong hostname or port, or POP/IMAP mixed up | Copy the values from Mail Configuration › Manual Settings |
| Certificate warning in the mail app | Using mail.yourdomain.com when DNS isn’t at SiteGround |
Use the server hostname from Manual Settings |
| Messages go to recipients’ spam | SPF, DKIM, or DMARC failing | Check Email › Authentication, then Gmail’s “Show original” |
| Contact form emails never arrive | WordPress sending mail without authentication | See our contact form setup guide |
| No mail arriving at all | MX records point somewhere else | See fixing business email after a DNS change |
FAQ
Does SiteGround include email?
Yes. SiteGround's web hosting plans include email hosting. Create mailboxes in Site Tools › Email › Accounts, and forwarders in Email › Forwarders.
What are SiteGround's email server settings?
Use IMAP on port 993 and SMTP on port 465, both with SSL/TLS, and your full email address as the username. The exact server name is shown in Site Tools › Email › Accounts › Mail Configuration › Manual Settings.
Should I use IMAP or POP3?
IMAP, in most cases. It keeps mail on the server so every device shows the same inbox. POP3 downloads messages to one device, which can make them disappear from others.
How do I enable DKIM on SiteGround?
Go to Site Tools › Email › Authentication and check the DKIM status. It should be active by default; if it's inactive, click Activate and the record is added to your DNS zone.
Why are my emails going to spam?
Usually because SPF, DKIM, or DMARC isn't passing, often because another service sends as your domain without being included in SPF, or because the domain's DNS isn't at SiteGround. Send a test to Gmail and use Show original to see which check fails.
Next: What Happens If You Change DNS Later
Your email depends on DNS records pointing to the right mail servers, and those are exactly the records that get lost when DNS moves. The next guide covers what goes wrong and how to fix it.