Setting Up WooCommerce on SiteGround
Some links on this page are affiliate links. If you buy through them, we may earn a commission at no extra cost to you. It never decides what we recommend —read how we make money.
WooCommerce is a free plugin that turns a WordPress site into a store: products, a cart, checkout, orders, and customer accounts. Installing it takes a minute. Running it well on shared hosting takes a little more understanding, because a store works differently from a blog in ways that affect speed, hosting limits, and how you update the site.
This guide covers the setup, then the SiteGround-specific parts: caching, resources, staging, and backups. SiteGround details are from its documentation, checked in September 2026.
Step 1: Install WooCommerce
- In your WordPress dashboard, go to Plugins › Add New Plugin.
- Search for WooCommerce, then click Install Now and Activate.
- WooCommerce opens a setup guide asking about your store: its address, what you sell, and a few optional extras. Skip anything you’re unsure about; all of it can be changed later under WooCommerce › Settings.
WooCommerce creates the pages a store needs, including Shop, Cart, Checkout, and My account. You’ll find them under Pages.
Step 2: The Settings That Matter Before Your First Sale
| Setting | Where | Why it matters |
|---|---|---|
| Store address and currency | WooCommerce › Settings › General | Drives tax, shipping, and how prices display |
| Payments | WooCommerce › Settings › Payments | No working payment method, no orders |
| Shipping zones | WooCommerce › Settings › Shipping | Where you ship and what it costs; skip for digital-only stores |
| Tax | WooCommerce › Settings › Tax (enable in General first) | Wrong tax is a legal problem, not just a setting |
| Emails | WooCommerce › Settings › Emails | Order confirmations customers rely on |
Payments
WooCommerce’s core only includes offline methods: direct bank transfer, check payments, and cash on delivery. To take card payments, add a payment extension, such as WooCommerce’s own WooPayments, Stripe, or PayPal. Each has its own fees and country availability, so compare them for where you and your customers are.
Tax
WooCommerce can calculate tax from rates you enter, and some extensions automate it. Either way, the rules depend on where you and your customers are. Check your obligations with an accountant or your tax authority rather than trusting a default.
Step 3: Add Your First Product
- Go to Products › Add New Product.
- Add a title, description, and price.
- Pick the product type:
- Simple product: one item at one price. Tick Virtual if it isn’t shipped, and Downloadable if the customer gets a file.
- Variable product: one product with options, like a shirt in sizes and colors, each with its own price and stock.
- Grouped product and External/Affiliate product exist too, for collections and items sold elsewhere.
- Add a main product image and gallery images, then Publish.
Launching with dozens of products? Use Products › Import with a CSV file rather than adding them one by one.
How SiteGround Handles a Store
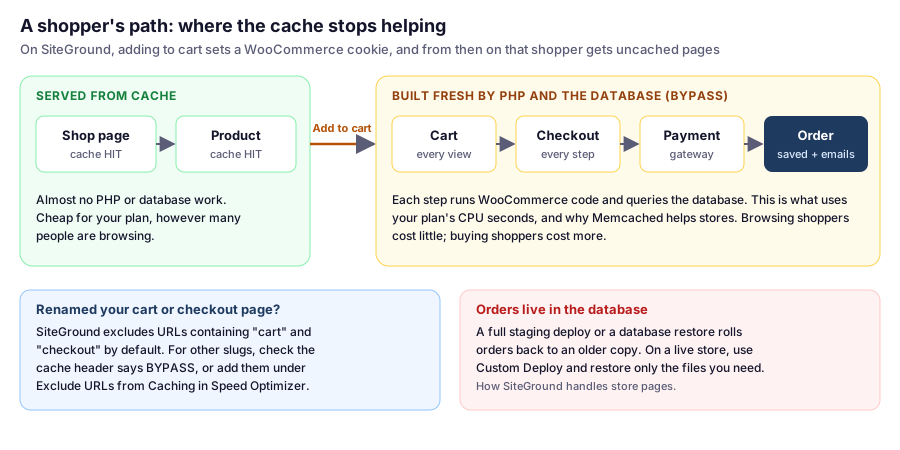
This is where a store differs from a blog. Browsing is cheap for your hosting; buying isn’t.
Caching Is Handled, but Check It
SiteGround’s Dynamic Caching excludes URLs containing cart, checkout, and add-to-cart by default, and switches a visitor to uncached pages once WooCommerce’s cart cookies are set. You don’t need to configure that. Two checks are still worth a minute:
- Shop and product pages should be cached. Open one logged out, in a private window, and check the
x-proxy-cacheresponse header in your browser’s developer tools. It should sayHIT. - Cart and checkout should not be. Add something to the cart, then check those pages: the header should say
BYPASS. If you renamed them, for example to/basket/, and they showHIT, add the path under Speed Optimizer › Caching › Exclude URLs from Caching.
Turn on Memcached in Site Tools › Speed › Caching as well. It speeds up the database work behind carts, checkouts, and the admin.
Plan Resources
Every add-to-cart and checkout uses PHP and database time, which is what SiteGround’s plans measure in CPU seconds. A store with steady sales uses far more than a blog with the same number of visitors. Our SiteGround review explains the limits and how to read your usage in Site Tools. If a growing store regularly hits them with caching working, see shared hosting vs. VPS for the next step.
Which plan? A small store can start on StartUp, but I’d choose GrowBig, mainly for staging: testing WooCommerce and payment plugin updates before they reach paying customers is worth more to a store than to almost any other site.
Updating a Live Store Without Losing Orders
Orders, customers, and stock levels live in the database, and they change every time someone buys. That changes how you use two tools you’d use freely on a blog:
- Staging deploys: SiteGround’s Full Deploy replaces the live database with the staging copy, which would roll back any orders placed while you were testing. Use Custom Deploy and push only the files or tables you changed. SiteGround backs up the live site before every deploy, so you can undo a mistake.
- Restores: restoring the database from last night’s backup deletes today’s orders. Restore only files where you can, and read our guide to backing up and restoring on SiteGround before restoring a store’s database.
A safe update routine: update on a fresh staging copy, place a test order there, deploy with Custom Deploy at a quiet time, then place a real low-value test order on the live site and refund it.
Before You Launch: A Test Checklist
- Place a full test order using your payment method’s test or sandbox mode, from a private window as a new customer.
- Check the emails arrive, for both you and the customer, and aren’t in spam. Our guide to business email on SiteGround covers the authentication records that keep them out of spam.
- Test on a phone, including checkout.
- Confirm HTTPS on every page, especially checkout. See our SSL guide.
- Add the legal pages your store needs, such as terms, a refund policy, and a privacy policy, and link them from checkout.
- Take a manual backup once everything works, so you have a clean baseline.
FAQ
Does SiteGround work well with WooCommerce?
Yes. SiteGround's Dynamic Caching automatically excludes cart and checkout pages and serves uncached pages once a shopper adds to cart, so stores work without extra cache setup. Stores use more CPU than blogs, so watch your plan's usage as sales grow.
Which SiteGround plan is best for a WooCommerce store?
GrowBig for most stores, mainly for staging, so you can test WooCommerce and payment plugin updates before they reach customers. StartUp can work for a very small store, but has no staging.
Do I need to exclude the cart and checkout from caching on SiteGround?
Not usually. URLs containing cart, checkout, and add-to-cart are excluded from caching by default. If you renamed those pages, check the x-proxy-cache header shows BYPASS, and add the paths under Exclude URLs from Caching in Speed Optimizer if not.
Can WooCommerce take card payments without a plugin?
No. WooCommerce's core includes bank transfer, check payments, and cash on delivery. For cards, add a payment extension such as WooPayments, Stripe, or PayPal.
Will deploying from staging delete my WooCommerce orders?
A Full Deploy replaces the live database with the staging copy, so orders placed after you made the copy would be lost. Use Custom Deploy to push only the files or tables you changed. SiteGround also backs up the live site before each deploy.
Getting to a Working Store
The fastest path: install WooCommerce, set your currency and a payment method, add one real product, and run a complete test purchase before telling anyone. Shipping rules, tax details, and extra product types can be refined once the basic loop of browse, buy, pay, and confirm works end to end.