Migrating an Existing WordPress Site to SiteGround
Some links on this page are affiliate links. If you buy through them, we may earn a commission at no extra cost to you. It never decides what we recommend —read how we make money.
Starting fresh on SiteGround is straightforward. Moving an existing site that already has traffic, content, and history is a different job. The goal is a clean handoff: visitors never see an error, nothing gets lost, and email keeps working.
This guide covers SiteGround’s free Migrator plugin step by step, a manual fallback for sites the plugin can’t handle, and the cutover plan that makes the switch invisible. Migrator details are from SiteGround’s knowledge base and the plugin’s WordPress.org page, checked in September 2026.
Before You Start: What the Migrator Does and Doesn’t Move
| Moved by the Migrator? | |
|---|---|
| WordPress content: themes, plugins, uploads, and the database | Yes |
| Email accounts and messages | No. Set these up on SiteGround separately |
| DNS records (MX, TXT, verification records) | No. Note them at your old host first |
| Other apps or folders outside WordPress | No |
| A full Multisite network | Not supported. Individual Multisite sites can be moved |
| A site on your own computer (localhost) | Not supported. SiteGround pulls the site from a public server |
Per the SiteGround Migrator listing on WordPress.org, checked September 2026.
If your site fits, the Migrator is by far the simpler path. If it doesn’t, or the transfer fails, use the manual method below. Your first professional migration is also free on new accounts, which is worth asking about for complex sites.
The Cutover Plan: Zero Downtime
The reason a migration can be invisible is simple: your old host keeps serving the site until your domain’s DNS points to SiteGround. The work is making sure the new copy is complete and correct before that switch.
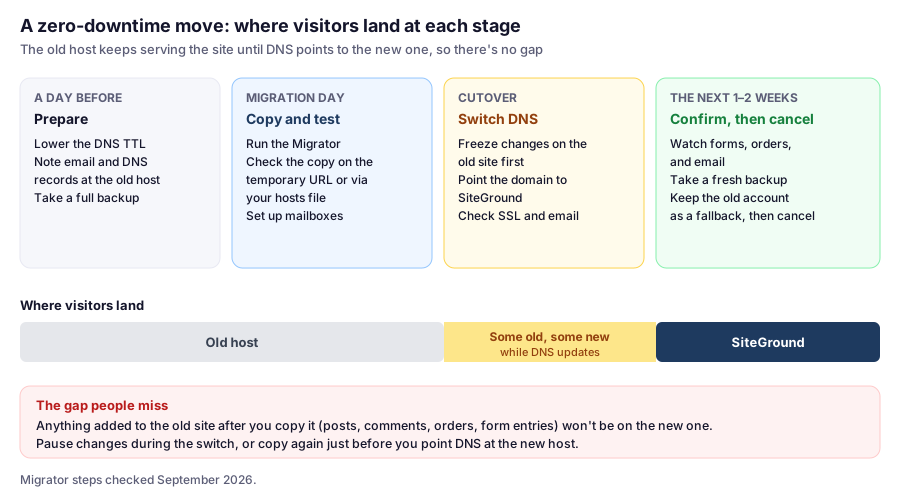
A Day Before
- Lower your DNS TTL. At your current DNS provider, set the TTL on your domain’s A record to something short, such as 300 seconds. When you switch later, visitors’ devices will pick up the change faster. (If your DNS is changing because you’re switching nameservers, this has less effect; the switch still works, it just takes longer to settle.)
- Write down every DNS record at your old host, especially MX (email), TXT (email verification such as SPF and DKIM, and site verification), and any CNAME records for services you use. These are the records that break email and integrations if they’re lost.
- Take a full backup of the old site.
Migrating With the SiteGround Migrator Plugin
- Generate a token on SiteGround. In Site Tools, go to WordPress › Migrator. Choose the Domain the site should move to, and leave the Path empty unless the site should live in a subfolder like
/blog. Click Generate, then Copy the migration token. - Install the plugin on your old site. In your current site’s WordPress dashboard, install and activate SiteGround Migrator from the plugin directory.
- Start the transfer. Paste the token into the plugin and press Initiate Transfer. The plugin emails your site’s admin address when the transfer is complete.
- Check the copy before touching DNS. The plugin gives you a temporary URL to review the site on SiteGround’s server. Click through your key pages, then continue with the checks below.
If the token expires or gets lost, generate a new one in Site Tools.
Check It Properly Before Switching
A temporary URL shows you the site loads. To test it exactly as visitors will see it, at your real domain, preview it through your computer’s hosts file: add a line mapping your domain to SiteGround’s IP (Site Tools › Dashboard › IP and Name Servers), then open the site. Remove the line afterward.
Check:
- Pages, posts, and images load, including older uploads
- Forms send and you receive the email
- Logins work, including for other users or customers
- Checkout works on a store, with a test order
- The page count matches. In both dashboards, compare the numbers under Posts, Pages, and Media. Some Migrator users have reported transfers that finished with content missing, so this one-minute count is worth doing.
Doing a Manual Migration Instead
If the Migrator can’t handle your site, the manual route gives you full control:
-
Export the database on the old host with phpMyAdmin, or over SSH with WP-CLI:
wp db export old-site.sql -
Download your files, above all
wp-content(themes, plugins, uploads), by SFTP or as an archive. -
Create a new database and user on SiteGround and import the
.sqlfile. Our guide to managing MySQL databases covers this. -
Upload the files to your site’s
public_htmlfolder on SiteGround. See uploading files to SiteGround. -
Update
wp-config.phpwith the new database name, user, password, and host. -
If the domain is changing, replace the old address in the database. WordPress stores full URLs in many places, some inside serialized data, so don’t edit the SQL file by hand. WP-CLI handles serialized data correctly; run it with
--dry-runfirst to see what it would change:wp search-replace 'https://old-domain.com' 'https://new-domain.com' --dry-run wp search-replace 'https://old-domain.com' 'https://new-domain.com'
Cutover Day
-
Freeze changes on the old site. Anything added after your copy (posts, comments, orders, form entries) won’t be on SiteGround. For a blog, avoid publishing for a few hours. For a store, pick a quiet time, or copy again just before switching.
-
Set up email on SiteGround first, if SiteGround will host it. See setting up business email on SiteGround.
-
Point your domain at SiteGround: either change nameservers, or update the A record to the Site IP. Our guide to managing DNS on SiteGround covers both, and re-create the records you noted earlier.
-
Check which server answers:
nslookup yourdomain.comOnce the answer shows SiteGround’s IP from your location, test the site again. Other visitors may still reach the old host for a while, which is normal and why the old account stays open.
-
Confirm HTTPS works on SiteGround. Our SSL guide covers installing a certificate and fixing mixed-content warnings.
Things That Commonly Break After a Migration
- Missing images or uploads: usually an incomplete copy of
wp-content/uploads. Compare the Media count on both sites. - 404 errors on every page except the homepage: go to Settings › Permalinks and click Save Changes without changing anything. That rebuilds WordPress’s rewrite rules on the new server.
- Mixed content warnings: some URLs still use
http://. See the SSL guide. - Redirects to the old or temporary address: check Settings › General. The WordPress Address and Site Address must both be your real domain with
https://. - Caching plugin conflicts: if the old site used a host-specific caching plugin, deactivate it and set up SiteGround’s Speed Optimizer instead. Two page caches fighting each other cause stale pages and odd bugs.
- Email stopped: MX or TXT records weren’t re-created. Check them against the list you made.
After the Migration
Once the new site has been stable for a few days:
- Take a fresh backup on SiteGround as your new baseline. See backing up and restoring on SiteGround.
- Remove the SiteGround Migrator plugin, and any migration-only plugins, from the site.
- Keep the old hosting account for a week or two in case you find something missing, then cancel it, checking its renewal date so you aren’t billed again.
FAQ
How do I migrate my WordPress site to SiteGround?
In Site Tools, go to WordPress › Migrator, choose the domain, and click Generate to get a migration token. Install the SiteGround Migrator plugin on your old site, paste the token, and press Initiate Transfer. Check the copy on the temporary URL, then point your domain to SiteGround.
Does the SiteGround Migrator move my email?
No. The Migrator moves your WordPress content: themes, plugins, uploads, and the database. Email accounts and DNS records need to be set up on SiteGround separately before you switch DNS.
Will my site go down during the migration?
It doesn't have to. Your old host keeps serving the site until DNS points to SiteGround, so if you test the copy first and keep the old account active during the DNS switch, visitors shouldn't see downtime.
What happens to orders or comments made during the migration?
Anything added to the old site after the copy is made won't be on SiteGround. Pause changes during the switch, or run the copy again just before you change DNS.
Can the SiteGround Migrator move a Multisite network?
Not a full network. Full Multisite installations aren't supported, although individual Multisite sites can be migrated. Sites on localhost and WordPress.com can't be moved with it either.
How long does DNS take to switch to SiteGround?
Often minutes to a few hours, depending on the record's TTL and whether you're changing nameservers. Lowering the TTL a day before helps. Keep your old hosting active until you're sure everyone is reaching SiteGround.