How to Install WordPress (Step-by-Step on SiteGround)
Some links on this page are affiliate links. If you buy through them, we may earn a commission at no extra cost to you. It never decides what we recommend —read how we make money.
With hosting purchased and a domain pointed at it, installing WordPress is the fast part. Most hosts include a one-click installer, so you won’t touch a single file.
This guide walks through the install on SiteGround step by step, then covers the settings to change in your first ten minutes. If you’re on a different host, there are sections for Hostinger’s hPanel and cPanel hosts too.
Before You Start
Make sure these are in place:
- A hosting account. If you haven’t chosen one yet, see our WordPress hosting comparison, or our SiteGround buying guide if you’ve settled on SiteGround.
- A domain pointed at your host. Your domain’s nameservers or DNS records need to point to the hosting account. DNS changes can take anywhere from a few minutes to a few hours to take effect.
- Your admin details ready: a username (not “admin”), a strong password, and an email address you actually check.
Not sure everything’s ready? Run through our checklist of what you need before installing WordPress.
Check That Your Domain Points to the Right Server
Most “the install worked but my site won’t load” problems are DNS. Before installing, compare the IP address your domain resolves to with the one your host gives you. SiteGround shows it under Site Tools › Dashboard › IP and Name Servers as the Site IP. In a terminal (or Command Prompt on Windows):
nslookup yourdomain.comIf the address in the answer matches your host’s, you’re ready. If it doesn’t, DNS is still pointing somewhere else or hasn’t updated yet. You can install anyway, but you won’t see the new site at your domain until it does.
How to Install WordPress on SiteGround
SiteGround’s installer lives in Site Tools, its control panel.
Step 1: Open the WordPress Installer
Log in to SiteGround, open Site Tools for your site, and go to WordPress → Install & Manage.
Step 2: Fill In the Application Setup
Select WordPress, then fill in:
- Domain: the domain where you want WordPress installed
- Language: the language for your WordPress dashboard
- Installation Path: leave this empty to install WordPress at your domain’s root (
yourdomain.com). Only enter a folder name if you want it at something likeyourdomain.com/blog.
Step 3: Set Your Admin Details
Enter the WordPress admin username, password, and email:
- Username: avoid “admin.” It’s the first username automated login attempts try.
- Password: use a long, unique password and save it in a password manager.
- Email: use a real address. Password resets and important site notices go here.
Step 4: Decide on “Install with WordPress Starter”
SiteGround offers an Install with WordPress Starter checkbox. It installs SiteGround’s in-house WordPress Central plugin, which offers a curated list of themes and plugins, plus example content, to help you launch your first site faster.
Should you tick it?
- Tick it if you’d like guided suggestions to get a first site up quickly.
- Leave it unticked if you already know which theme and plugins you want, such as GeneratePress. That keeps your fresh install clean.
As a developer, I usually start from a clean install and add only what the site needs. Fewer plugins means less to update and less to go wrong.
Step 5: Install
Click Install and wait. SiteGround installs WordPress on your domain. When it finishes, you’ll be able to open your site’s front page or log in to the WordPress admin.
What the Installer Just Did
A one-click install saves you about ten manual steps, but it helps to know what it created. When something breaks later, this is the map you’ll need:
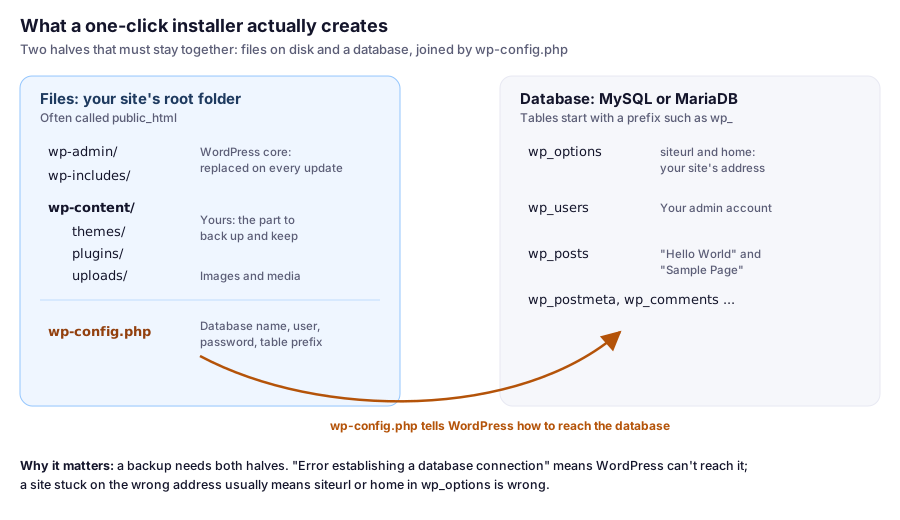
Three things follow from this:
- A backup needs both halves. Files without the database, or the database without
wp-content, won’t restore your site. SiteGround’s backups cover both. - “Error establishing a database connection” means WordPress can’t reach the database using the details in
wp-config.php. - A site that redirects to the wrong address usually has the wrong
siteurlorhomevalue, which you’ll see under Settings → General as the WordPress Address and Site Address.
Logging In for the First Time
Your WordPress dashboard is at yourdomain.com/wp-admin. Bookmark it. SiteGround also lets you reach it from Site Tools. Our guide to logging into your WordPress dashboard covers every route, plus what to do if you forget your password.
Your First 10 Minutes After Installing
These quick settings save you from fixing things later.
1. Confirm HTTPS Is Working
Visit your site with https:// and check for the padlock in the browser. If it isn’t working, check Security → SSL Manager in Site Tools. Our SSL setup guide walks through installing a certificate and fixing “not fully secure” warnings.
2. Set Your Site Title, Tagline, and Timezone
Go to Settings → General. Set your site title and tagline, and pick a timezone so scheduled posts publish at the right time. While you’re there, check that WordPress Address and Site Address both start with https://. If they say http://, sort out SSL first, then update them.
3. Set Your Permalink Structure
Go to Settings → Permalinks and choose Post name. This gives you clean URLs like yourdomain.com/my-first-post/. Do it now, before you publish anything, so you don’t have to redirect old links later.
4. Choose Your Homepage
Go to Settings → Reading. Choose whether your homepage shows your latest posts or a static page. Most business sites use a static page.
5. Delete the Sample Content
Delete the default “Hello World” post and “Sample Page.” Left in place, they make a site look unfinished.
6. Remove What You Won’t Use
Under Plugins and Appearance → Themes, delete anything you don’t plan to use. Inactive plugins and themes still need updates, and they’re one more thing to maintain.
7. Install a Lightweight Theme
A lean theme gives you a faster starting point. We recommend GeneratePress. Our GeneratePress setup tutorial walks through installing and configuring it, and our GeneratePress review covers whether you need the premium version.
8. Check Your Backups
Before you start building, know how to restore your site. Here’s how backups work on SiteGround.
9. Run a Quick Health Check
Go to Tools → Site Health. The Status tab flags problems like an outdated PHP version, and the Info tab shows your PHP version, memory limit, and database version. A fresh install on a current host should show few or no critical issues.
For Developers: The Same Checks With WP-CLI
SiteGround supports SSH and WP-CLI, so if you’re comfortable in a terminal you can confirm the install and set permalinks in a few commands. Run them from your site’s root folder:
wp core version
wp option get siteurl
wp option get home
wp rewrite structure '/%postname%/'
The first three confirm the WordPress version and the addresses WordPress thinks it lives at; the last sets the Post name permalink structure. Our SSH guide covers connecting to SiteGround.
Installing WordPress on Other Hosts
Hostinger (hPanel)
On Hostinger, you install WordPress with the Auto Installer:
- In hPanel, go to Websites → Dashboard, then Website → Auto Installer in the left sidebar, and select WordPress.
- Fill in the website title, administrator email, administrator username, and administrator password. An Advanced section lets you install in a subdirectory or on a subdomain, or use an existing database.
- Click Next, then choose the application version (Hostinger recommends the latest), language, and update schedule (Hostinger recommends updating to minor versions).
- Click Install.
If you’re still choosing, see our Hostinger review or SiteGround vs Hostinger.
cPanel Hosts
Many hosts that use cPanel include an app installer such as Softaculous. ChemiCloud, for example, lists Softaculous one-click installs on its WordPress plans. The flow is similar to the installers above: open the installer from cPanel, choose WordPress, pick your domain, enter your site name and admin details, and install. Your host’s knowledge base will have the exact steps for its setup.
Manual Installation
If your host doesn’t offer an installer, you can install WordPress manually. Download it from WordPress.org, create a database and database user, upload the files to your server, and run the setup in your browser. It’s more involved, and on a managed WordPress host you shouldn’t need it. Our guides to managing MySQL databases and uploading files to your server cover the pieces you’d need.
If the Install Fails or Your Site Won’t Load
- Wait for DNS. The most common cause of problems right after setup is DNS that hasn’t finished updating. Wait 15–30 minutes and try again.
- Check your DNS records. Confirm your domain actually points to your hosting account. Here’s how to manage DNS on SiteGround.
- Check the installation path. If your site shows up at
yourdomain.com/wpinstead ofyourdomain.com, a folder name was entered in the Installation Path field. - Check for an existing site. If something is already installed on the domain, decide whether to replace it or install WordPress somewhere else, such as a subdomain.
- Contact support. If an install keeps failing, your host’s support team can see what’s happening on the server.
FAQ
How do I install WordPress on SiteGround?
In Site Tools, go to WordPress → Install & Manage, select WordPress, and fill in the Application Setup (domain, language, installation path) and your admin username, password, and email. Optionally tick Install with WordPress Starter, then click Install.
How long does it take to install WordPress?
With a one-click installer like SiteGround's or Hostinger's, the install itself takes a few minutes. Getting your domain's DNS pointed at your host can take longer, from minutes to a few hours.
Should I use SiteGround's WordPress Starter option?
It's optional. It installs SiteGround's in-house WordPress Central plugin, with a curated list of themes and plugins and example content. It can help beginners get started quickly. If you already know which theme and plugins you want, a clean install without it keeps things simpler.
What should I do right after installing WordPress?
Confirm HTTPS works, set your site title and timezone, set permalinks to Post name, choose your homepage, delete sample content and unused plugins and themes, install your theme, and confirm how backups work.
How do I install WordPress on Hostinger?
In hPanel, go to Websites → Dashboard, then Website → Auto Installer, and select WordPress. Enter your site title and admin details, click Next, choose the version, language, and update schedule, then click Install.
Why isn't my new WordPress site loading?
Usually because your domain's DNS hasn't finished updating, or doesn't point to your hosting account yet. Wait a little, check your DNS records, and confirm WordPress was installed at the domain root rather than a subfolder.
How do I check my domain points to my new host?
Run nslookup yourdomain.com in a terminal or Command Prompt and compare the IP address with the one your host shows you; SiteGround shows it under Site Tools › Dashboard › IP and Name Servers. If they don't match, DNS is still pointing elsewhere or hasn't updated yet.
Do I need to install WordPress manually?
Usually not. Most WordPress hosts include a one-click installer. Manual installation is only needed on hosts without one.
Where to Go From Here
With WordPress installed, get comfortable with the WordPress dashboard. It’s the screen you’ll spend the most time in, and it’s worth understanding before you start building.